Add this ab workout into your next workout session! Tell me what you think. Kiz x  @kiz489 Instagram


Add this ab workout into your next workout session! Tell me what you think. Kiz x @kiz489 Instagram

The Core Muscle Strength and Stability Test

This is an easy way to building core strength, but also a great way of evaluating your core strength.
The Core Muscle Strength and Stability Test is a way to determine your current core strength and gauge your progress over time.
The Core Muscle Strength & Stability Test:
Objective: To test
and to gauge improvements of an individual’s core strength and endurance over time.
Equipment:
Conducting the Test:

start plank
Results:
The Core Muscle Strength & Stability Test was designed by Brian Mackenzie, a senior athletics coach with UK Athletics.

Build-a-Booty Workout

Challenge yourself and really work those glutes and thighs in this great workout
Exercises:
1⃣- Cable pull throughs
2⃣- Smith machine single leg bridges
3⃣- Smith machine Donkey kicks
4⃣- Single leg knee ups with weight
10 reps (each leg for 2⃣, 3⃣& 4⃣) x 3-4 rounds.
1⃣ using 60-80lb, 2⃣&3⃣ using 10kg on smith machine bar & 4⃣ using 8kg kettlebell
Give it a go!


A squat is a fundamental movement pattern. However, when looking at the squat biomechanics, it is quite complex. Several joint and muscular systems must work in unison to ensure the correct movement is achieved, especially when adding external loads like bar weights.
To break the movement down, during a weighted squat we want the hips, knees, and ankles to flex adequately to reach the desired depth, whilst maintaining a “neutral spine”.
The amount that the hips, knees, and ankles must flex in order to reach the desired position depends on the individuals’ mobility and flexibility to create these movements. That is to say, flexion of hips, knees, and ankles may be tight and weak and then a neutral spine is unable to be maintained.
What is “neutral spine”. In normal resting posture, the spinal curves create an “S” shape; these natural curves help to distribute compressive loads. The curves consist of; lordosis in the lumbar spine (curve out), kyphosis of the thoracic spine (curve in), and lordosis of the cervical spine (curve out).
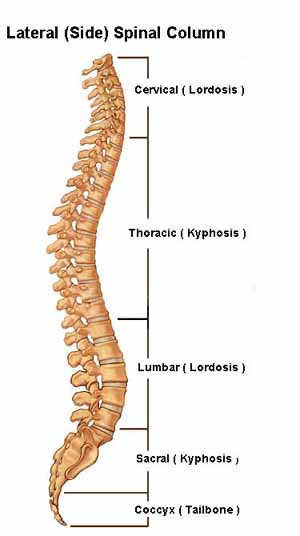
The normal resting curvature of the thoracic spine is kyphotic (in) and it’s difficult to maintain a mild kyphosis while under load, and excessive flexion through the thoracic and lumbar spine (hunching over) becomes more likely if posture is unable to be maintained. Losing correct posture and hunching the spine under load I can lead to serious lower back injuries.
Chest up, Head facing forward will maintain the neutral spine you are after when performing loaded squats. This gives us a balance of passive stability (bones, tendons and ligaments) and active stability in the muscles to support heavy weights. core activated throughout the entire movement.
Imbalances in the muscles can also create issues with squat technique. Glute weakness, over tight hip flexors, pelvic instability etc. can be the causes of inadequate squat technique. if load is then added, structures of the body that are already overworking to make up for these imbalances become even more strained, and increased risk of injury occurs. The stronger muscles become stronger while the weaker muscles remain weak.
In summary, a squat requires a certain amount of flexion at the hips, knees, and ankles with a spine that does not change in curvature during the movement. If you have trouble maintaining a neutral spine or feel off balance when performing a squat or weighted squat, test out your flexibility through your lower back, hip flexors, hamstrings and calves. Determine what is tight. For myself, my Hamstrings and hip flexors (iliopsoas) are really tight and can hinder my correct squat movement. In my video you will notice when I get to parallel when my hips start to roll under due to tightness. This is an example of how imbalances can change the spine’s natural curves, my hamstrings pull my pelvis under due to lack of flexibility when I get to parallel to the ground. This should occur lower down in the movement.
Dynamic stretching before weighted squats and static stretching daily can improve the range of movement in turn increasing your mobility during squats.
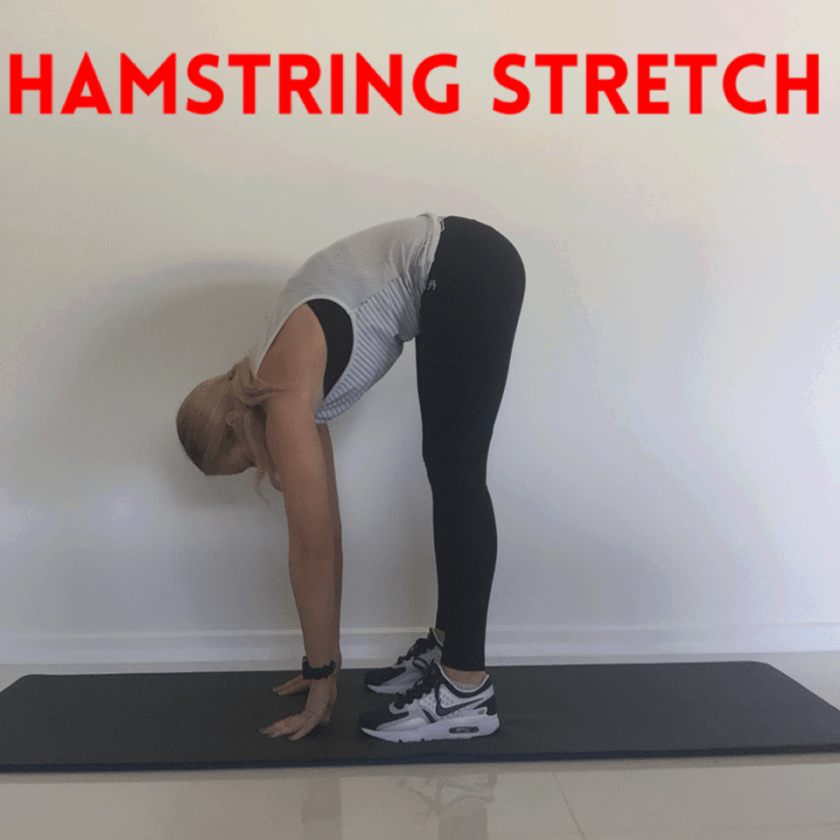
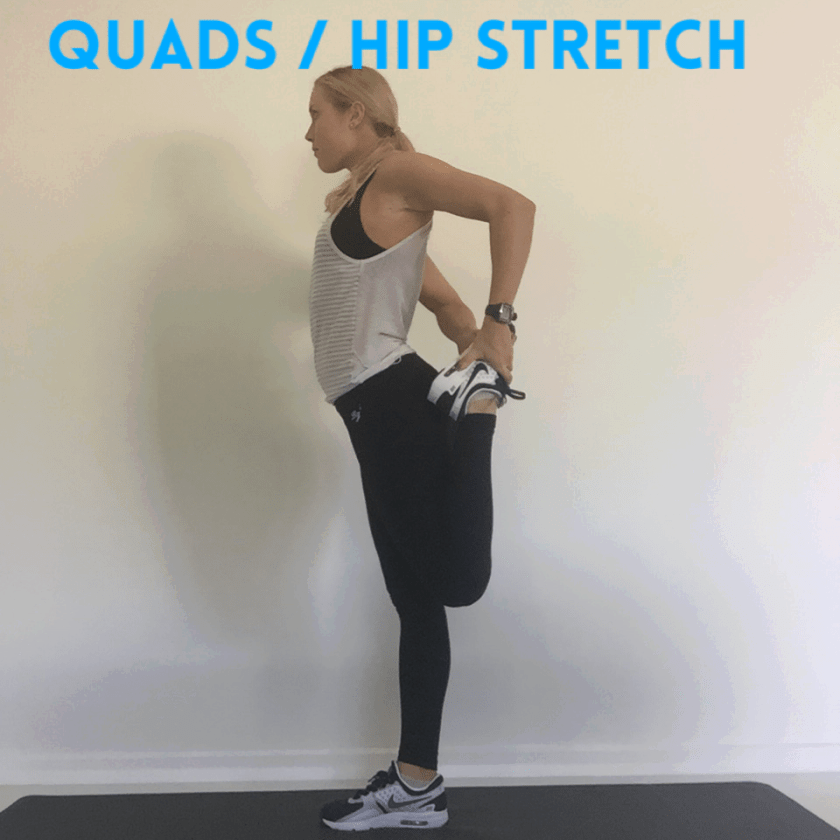
I have included a basic stretch program for hips, hamstrings & calves to try and see if it improves your squats. Mine still aren’t 100% perfect due to my tightness in my hips that’s I’m working on daily (slowly but surely getting there!) my core tends to drop when I reach this point also, another area I need to be careful to protect my spine. I’m aware of my limits and don’t push to increase weight unless i am capable of the full movement first.
1) Stance:
Use an athletic stance for the squat so that your knees are slightly bent, feet are firmly planted on the ground, and toes pointed outwards slightly, which helps with stabilization. The wider you put your feet, the more it works your glutes and hamstring (back of the leg), and the easier it will be to stabilize. The closer in you put your feet; the more your quadriceps will be emphasized (the front of the leg).
One common mistake when people use too much weight is that one, or both knees will cave in towards their centre. Make sure to keep your knees out and choose weight that is appropriate for your level.
One mistake people make when they squat is rounding their necks, or looking down at the ground. The spinal alignment is automatically thrown off, which makes the squat a very dangerous exercise, especially if you are using a lot of weight.
Keep your eyes forward as you squat down, this way your head is automatically in the correct position.
3) Hip Hinge:
When most people try to squat, the knees pass over the toes, the butt stays tucked under, and the heels come off the floor. This happens because proper squat technique requires some hip flexibility, proper balance, and mobility through the “hip hinge”.
Each time you squat you should start with your hips level with your feet. The start of the movement is to hinge your hips so that your butt moves backwards during the downward phase of the squat, (think of sitting on a toilet) your knees will no longer protrude well over your toes. This in turn takes pressure off the knees and puts the weight on the muscles. Also, the pressure of the squat should be in your heels (you should be able to wiggle your toes) and you will be able to get more depth to your squat, if you have the required flexibility and stability in
the hips.
The key with the squat is to make sure your spine is in proper alignment. By keeping your shoulder back and your chest out, your lower back will most likely have the correct natural curve. If you instead round your shoulders and sink your chest in, your spinal alignment will change to a “C” shape rather than the natural “S” shape. See diagram above.
ExhaleUp/Inhale Down – breath and movement working in unison. Breathing is very important for squatting in particular because it is a challenging exercise. Improper breathing can make you light headed, or nauseous, and in extreme cases, some people even black out. As you are lowering yourself, remember to take a deep breath in, and then as you are pushing up, breathe out forcefully. (Think Darth Vader) Always keep this breathing pattern. Towards the last few reps, you may consider taking a few extra breaths at the top of the squat position as you are standing for some extra energy.
6) Squat depth:
The depth of the squat primarily depends on your hip flexibility. If your hips are very flexible, then you may be able to squat “below parallel” (hamstrings are below parallel with the floor) and if you have poor hip flexibility, then you will be “above parallel”.
In general, try to shoot for your hamstrings about parallel with the floor, which deeply engages your thighs, hips, and glutes. Some power lifters will squat “ass to grass”, If you can go lower than parallel that’s fine, just make sure you don’t experience any pain in your knees, or lower back, and always keep your lower back flat, to slightly arched.
Try watching yourself in the mirror or have a friend record you so you can visually see your technique and where you can make improvements.
Check out my video of myself performing a squat in the low bar position @kiz489 –


Today’s post is my favourite Lower Body Stretches.. Post leg day!
Now I do a lot more stretches but I find these either work the best for me or I just enjoy them because I can chill out (after the initial tightness subsides)
Top Left: hamstring and inner thigh. You want your bottom right against the wall and legs up, slowly lower them down to were you can feel the stretch but not pain! Good for a minute or 2 and you will notice that as the muscle relaxes and assistance from gravity, that your legs will drop down.
Top Right: Hip flexor stretch, my hip flexors are ON all the time, they are very tight and I have to ensure when I do abs that I don’t over use them. I do this stretch because I need it to keep my pelvis in the correct position and prevent increased lordosis. How to do it: with one leg in front, you are kneeling on the other. You push your hip forward until you feel a stretch in your hip. For a deeper stretch, grab the foot and pull it towards your bottom of the knee you kneel on. Make sure your are pushing the hip forward and keeping your chest up.
Bottom Left: Quads/hip flexors: once again, super tight. You want to start this one in just one leg. With one leg out in front, you bend the opposite leg under do your foot tucks to the side of your bottom. Gently lean back so you are putting weight on your hands behind your hips, weight until it is comfortable and then move back onto your forearms. If you can, gently layback so your back is on the ground. Feel under your lower back. Is there a big gap? This is due to tightness, you will notice after a minute it should decrease. Regular stretch will decrease this gap. Gently unravel and swap sides.
Advance: same process but both legs bent. Be gentle and slow controlled movements with this one!
Bottom Right: Calf/ hamstring stretch:
Downward dog, Criss one leg over to put more weight into the stretch, aim to get the heel to gently move towards the ground. Repeat on other leg.
What stretches do you find work best for you?

Static Lunges: So after a few people on my @kiz489 have asked about lunges and how to do them correctly, the most common is ‘how far should my front knee move or not move?’
So biomechanically, your whole knee should be above your ankle on the front leg. There is a small variance where you can allow it to move towards your toes but never passed them( This is safe ROM – Range Of Movement), this will overload the knee cap & knee joint. The next is that there should be a gap from your front heel to the back knee to evenly distributed the weight between both legs and not overload the front knee.
Reasons why your knee might be going passed your toes:
🔺 Hamstring tightness: like myself, in my previous video my knees move towards my toes but not passed, if you have hamstring tightness your stride will be shortened so your knee will move forward.
🔺 Forward tilt: if your torso tilts forward this will change the angle of your pelvis and result in the movement continuing forward with your knees moving over your toes.
It is important to stay on top of your stretches, I didn’t this week and resulted in increased tightening of my H/S, after a good stretch session from yesterday’s to today’s post I’ve already increased my stride length. Postural awareness and keeping your chest up and not letting your upper body tilt forward.
I hope that helps!

Lower Body Foam Rolling
Video is posted on my Instagram page @kiz489 if you wish to view.
Spend 90 seconds on each area and return to a tight or “sore” spot, which are called Trigger Points. The causes of Trigger points can be:
• Overuse injury, strain
• Inflammation
• Stress
• Prolonged immobility
• Hormonal or nutritional imbalance
• Poor posture.
There is a lot of information on Myofascial Release if you are interested in learning more..
Try these basic lower limb Myofascial releases with a foam roller.
– Hamstring into calf
– Glutes
– Quads
– ITB (iliotibial band)
For deeper releases you can use a spikey ball, especially getting into the hamstrings to increase flexibility.
You can feel a little yuck after foam rolling, so be sure to drink lots of water after to flush the toxins you have released from the muscle into the bloodstream.
